2023-12-01
【React新手村】What is Redux?
原文發表於 Medium。
若大家有經手過稍微大一點的專案,就會發現跨元件的狀態管理架構是很重要的。它讓每個元件透過一兩行的代碼就可以共享同一個狀態(例如:使用者資訊、購物車內容),讓頁面的更新與炫染有更加一體性的呈現。
我們除了可以選擇React內建的context進行狀態管理外,Redux是很多業界高手的選擇。
Redux簡介
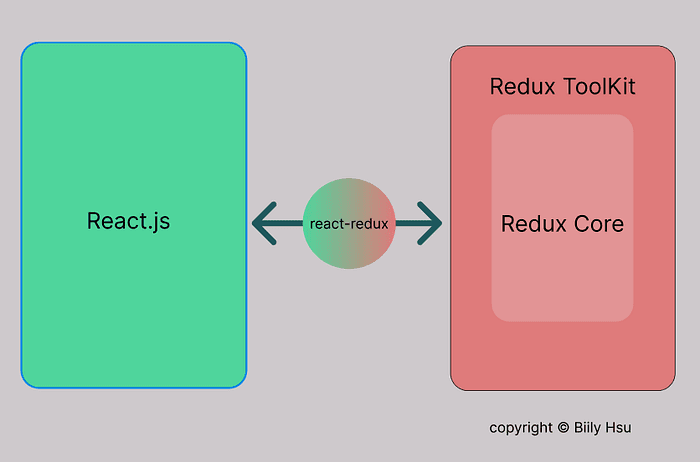
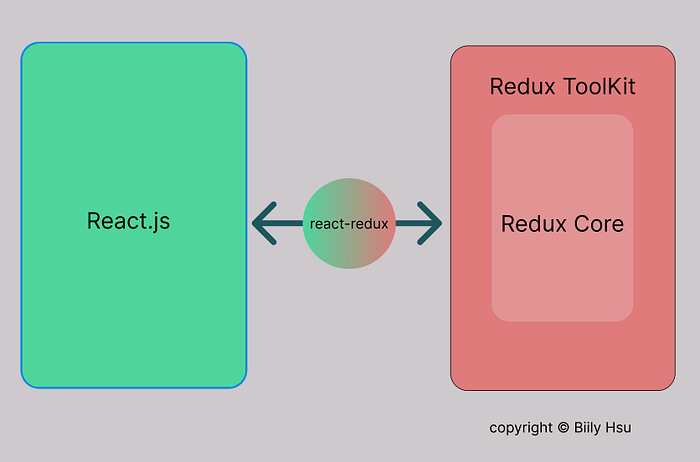
在Redux的官網上寫道,它是一個 “A Predictable State Container for JS Apps”,是專門幫我們管理state的工具,然而Redux卻不是專屬於React的第三方套件,因此在使用上跟React許多build-in feature的使用風格並不相同,而且Redux也無法在React專案中開箱即用。
npm install @reduxjs/toolkit react-redux redux;
在React專案之下,要安裝所需的套件才能使用,在這過程中可發現,我們除了Redux本身之外,還另外要安裝 @reduxjs/toolkit 跟react-redux這倆套件,前者是幫助我們使用Redux更加方便,後者則是幫我們將React element tree與Redux聯繫起來的橋樑。
開始動手使用Redux
首先依照慣例,使用Create React App,在Conmand Line輸入:
npx create-react-app my-app
之後,在my-app專案資料夾內,我們需要建立一個store資料夾在src主資料夾下,並且在其中建立一個store.js檔案,作為redux的主要窗口。
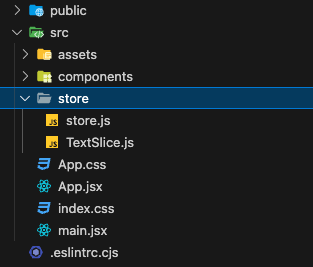
資料夾內的示意圖
接著在store.js中調用redux toolkit的configureStore函數,並做成一個它的實體:
//store.js
import { configureStore } from "@reduxjs/toolkit";

export const store = configureStore({
  reducer: {
   ...
  },
});
在configureStore函數中必須要指定一個具有reducer參數的object。接著我們就要使用React-redux套件將redux裝入專案之中。
//main.js
import React from "react";
import ReactDOM from "react-dom/client";
import { Provider } from "react-redux";
import { store } from "./store/store.js";

ReactDOM.createRoot(document.getElementById("root")).render(
    <Provider store={store}>
      <App />
    </Provider>
);
如上面的代碼,我們使用react-redux的Provider元件,然後將它將整個app都warpping起來,再使用store這個props將我們前面所寫的redux入口檔案中導出的store放入Provider。如此一來,所有在<App/>下方的子元件都可以使用redux的資料了。
那麼資料從哪來呢?剛剛說在configureStore函數中的reducer又是什麼呢?先說reducer,它是我們將所需的資料分門別類的地方,例如我需要一個text檔案,那麼它可寫成:
export const store = configureStore({
reducer: {
text: textReducer,
},
});
資料就從這裡來,接著我就要解釋text中的textReducer哪來了。
Reducer / Slice
有使用過React useReducer這個 hook的夥伴應該對於以下的寫法不陌生:
const initialState = {
todos: [
{ id: 0, text: 'Learn React', completed: true },
{ id: 1, text: 'Learn Redux', completed: false, color: 'purple' },
{ id: 2, text: 'Build something fun!', completed: false, color: 'blue' }
],
filters: {
status: 'All',
colors: []
}
}
// Use the initialState as a default value
export default function appReducer(state = initialState, action) {
  // The reducer normally looks at the action type field to decide what happens
  switch (action.type) {
    // Do something here based on the different types of actions
    default:
      // If this reducer doesn't recognize the action type, or doesn't
      // care about this specific action, return the existing state unchanged
      return state
  }
}

//copy from redux
上方的appReducer就是一個標準的例子,可知reducer在定義上包含著state的值,以及可以驅動變化的action。而前一段中的textReducer就是一個類似於此的結構。
Slice
由於自己寫reducer太過麻煩了,加上後續還需要給前端UI定義Action來改變數值,這就展現了redux toolkit的超棒價值:我們可將不同的reducer與相關的功能包在一個slice裏面。例如建立一個textSlice.js專門管理有關text的相關功能與值。
import { createSlice } from "@reduxjs/toolkit";
const initialState = {
  text: "Press the Button to change the text!",
};

const stringArray = ["apple", "banana", "orange", "grape", "kiwi"];

export const TextSlice = createSlice({
  name: "text",
  initialState,
  reducers: {
    random: (state) => {
      const randomText =
        stringArray[Math.floor(Math.random() * stringArray.length)];
      state.text = randomText;
    },
    change: (state, action) => {
      state.text = action.payload;
    },
  },
});

export const { random, change } = TextSlice.actions;
export default TextSlice.reducer;
在上述的代碼中,我們給了網頁上顯示的初始值(initialState),接著使用redux toolkit 的createSlice函數,在入參的object中,以第一個屬性將這個slice命名 (name: “text”),然後在第二個屬性給定initialState。在最後一個屬性中設定各種操作數值功能(也就是reducer)。
針對text的值,我想要有兩個變動它的機制,首先是給定一個random的字串(random),第二個是可以讓user輸入字串來改變text的值(change)。這倆個機制以函數來呈現,讓我們放大random的 reducer函數來看一下:
random: (state) => {
const randomText =
stringArray[Math.floor(Math.random() * stringArray.length)];
state.text = randomText;
}
這個reducer的第一個參數一定是state,也就是目前的數值狀態,如果是網頁第一次渲染時,那麼state的值就會是initialState。然後我們可以利用reducer來修改state的值。
Action
然而在random這個函數中,使用者並不能使用自定義的值來改變state,因為他沒有使用action。action是reducer第二個參數,當使用者從UI夾帶資料給reducer運算時,使用action來抓取該資料:
change: (state, action) => {
state.text = action.payload;
},
在上面的change reducer函數中,我們將state.text的值變成action.payload的值。
**總覽Slice
** 我們就來回顧一下slice的樣子
import { createSlice } from "@reduxjs/toolkit";
const initialState = {
  text: "Press the Button to change the text!",
};

const stringArray = ["apple", "banana", "orange", "grape", "kiwi"];

export const TextSlice = createSlice({
  name: "text",
  initialState,
  reducers: {
    random: (state) => {
      const randomText =
        stringArray[Math.floor(Math.random() * stringArray.length)];
      state.text = randomText;
    },
    change: (state, action) => {
      state.text = action.payload;
    },
  },
});

export const { random, change } = TextSlice.actions;
export default TextSlice.reducer;
您可以發現到我們除了必須將createSlice的實體匯出之外,還必須將random、change兩個reducer從createSlice下的actions屬性中抓出(不要忘了s)並匯出。
最後,整個slice的default匯出值就是createSlice下的reducer屬性,這個也是在store.js中的那個textReducer。
import { configureStore } from "@reduxjs/toolkit";
import textReducer from "../store/TextSlice";//TextSlice.reducer
export const store = configureStore({
  reducer: {
    text: textReducer,
  },
});
如此一來,slice就幫我們用一個函數,把reducer跟action都準備好了。
在React Component中使用redux
使用redux有兩個情境,調用數值/改變數值。
調用數值
需要用來顯示資料的component,透過react-redux中的useSelector hook調用Redux數值。
//TextPrint.jsx
import { useSelector } from "react-redux";
const TextPrint = () => {
  const text = useSelector((state) => state.text.text);

  return (
    <div>
      <h1>{text}</h1>
    </div>
  );
};

export default TextPrint;
注意在useSelector中入參的是一個函數(這與其他react hook的常態不同),在該函數中會自動入參state,我們要做的就是以 “state.slice名稱.調用資料名稱” 抓出該值。
改變數值
要讓使用者改變數值的component設定較為複雜:
//TextChangeController.js
import { useDispatch } from "react-redux";
import { random, change } from "../store/TextSlice";
import { useRef } from "react";

const TextChangeController = () => {
  const dispatch = useDispatch();
  let ref = useRef();

  return (
    <>
//random
      <div>
        <button
          onClick={() => {
            dispatch(random());
          }}
        >
          Get Random Text
        </button>
      </div>

//custom input state
      <div style={{ marginTop: "20px" }}>
        <input style={{ fontSize: "20px" }} ref={ref} />
        <p>
          <button
            onClick={() => {
              dispatch(change(ref.current.value));
              ref.current.value = "";
            }}
          >
            Change Text with inputed text
          </button>
        </p>
      </div>
    </>
  );
};

export default TextChangeController;
在此處最重要的就是使用useDispatch hook,使用一個變數裝載其實體 :
const dispatch = useDispatch();
接著導入Slice中的reducer:
import { random, change } from "../store/TextSlice";
使用的方式就是在dispatch中引入reducer來啟動變化(記住reducer必須要在引入時執行)
dispatch(random());
//使用者帶入資料時使用方式如下
dispatch(change(ref.current.value));
如此就可以完成跨元件的資料取用與指派。
使用Redux可以高效能地完成狀態的管理,由於它獨立於React之外,因此避免掉了React Context中讓人詬病的效能浪費。只是習慣於使用React Context 的夥伴可能會抱怨Redux的使用方式太過複雜,風格跟React其他的功能都不太相同。
由於我也時常在這兩種方案中游移不定。
有時Side Project越寫越大,開始要使用跨元件的狀態管理時,為了怕麻煩所以還是第一時間選擇了React Context,但隨著專案更大(不用到真的很大)之後,就會感覺使用Redux好像更加適合。那是什麼感覺呢?我只能說,頁面flash的那毫秒間的差異,就會讓你想要重新選擇Redux。
改天就來寫React Context吧!